Aperture, Depth of Field and Diffraction
"Sharpness is a bourgeois concept" - Henri Cartier-Bresson
Aperture
Simply stated the aperture is a variably sized hole light passes through in a lens. Apertures are defined as a relationship to the focal length of the lens, so f/4 is a hole 1/4 the size of the focal length of the lens. An f/4 hole in a 100mm lens is 25mm in diameter. In a 24mm lens it is only 6 mm. An f/11 aperture is 9.09mm in a 100mm lens. The larger the f/number the smaller the physical size of the aperture, so an f/8 aperture is smaller than an f/2 aperture. The aperture is therefore not a specific size but a relationship to the focal length. The reason for this relationship is that with these parameters the amount of light that reaches the sensor is approximately the same regardless of the lens we use. However, there are other factors such as transmission efficiency that can affect the amount of light actually reaching the sensor. Two different lenses may vary in efficiency to the point where exposure differences become noticeable. In most cases the variations are in the range of 1/4 stop or less which is ignorable for practical purposes.
In addition to controlling the amount of light passed by the lens, the effect the aperture has on the image is called depth of field. As light rays pass through the lens they are focused to a point at which the image is seen as sharp. Light rays before and after the point of focus are less well defined and are perceived as less sharp. The resolution of the light of any given point is referred to as the circle of confusion or the degree to which the light is well resolved. As the size of the aperture decreases the circles of confusion are better defined immediately before and after the point of focus. As they get small enough to be perceived as sharp they create the "depth of field" or area of acceptable sharpness in the image. Even as we perceive acceptable sharpness over a range only the single point of focus is critically sharp.
Unfortunately, simply "closing down" to a smaller aperture like f/22 doesn't simply increase the depth of field and yield a perceptably sharper image. Other factors come into play, such as diffraction which can overcome the increased depth of field with a less defined circle of confusion even at the point of focus and result in an overall less sharp rendering of the subject. Pinhole cameras exhibit this effect well as they have extreme depth of field but very limited resolution. So, their images are "equally sharp" overall from foreground to background but also overall are less well defined and may appear pleasant but not really sharp. More on diffraction later.
In addition to issues at very small apertures, most lenses, especially zoom lenses, perform less well at their maximum aperture. Some aberrations (failure of all frequencies of light to converge at the same point) disappear as lenses are closed down from their maximum aperture. This creates a zone of best performance for a lens known as the sweet spot by photographers. Lenses may perform best between f/4 and f/11 depending on their maximum aperture and exhibit less than their best optical performance outside of this range. The numbers are not specific but vary based on the lens. Some lenses, particularly single focal length lenses, may be designed to perform extremely well at their maximum aperture, or the differences in performance may be so small as to be unnoticeable. A reason to test our equipment.
Depth of Field and Viewing Distance
How sharp an image appears depends on many things. The resolution of the eye is not the only factor. Our ability to distinguish between two points being separate depends on the distance to the object, our age and general visual acuity, and many other factors. In photography the depth of field or area of acceptable focus is a matter of focal length, aperture, the method of reproduction and the viewing distance. Billboards look perfectly sharp to us, but their resolution is actually very coarse, as little as 12 ppi. The closer we are to a print, the greater the required resolution the printing must be to prevent us from discerning the individual pixels or seeing the image as out of focus. Many photographers view a print from a very short distance to "see if it is sharp" which is not a good measure. The bigger the print the greater the "viewing distance" should be. If you cannot see the whole image comfortably you are too close to judge the resolution.
Depth of Field, or the apparent area of sharpness before and after the primary subject comes from the reduction in the size of the out of focus points of the image. These are called "circles of confusion". They can be easily seen when points of light are rendered out of focus and appear as discs instead. What is not apparent to you is that every point in the image is rendered in the same manner. The overlapping out of focus areas of the image blend into each other and create the effect you see. The overall quality of the out of focus image, especially in highlights, is what is referred to as bokeh and is a function of lens quality.
We generally refer to depth of field as the area of acceptably sharp focus. In front of and behind this area you see increasingly less sharp rendering of the scene. The objects in the image are not well defined and eventually the area simply is a soft blur. Control over the area of sharp focus and the areas of less well defined subject matter is a part of the creative process. In a portrait for example the photographer may choose to blur the background completely, or render it recognizable but not completely sharp depending on the purpose of the image. Shallow depth of field limits the sharp area to concentrate the viewer's attention on the important subject. In landscapes and architectural images it may be preferable to have the entire image appear sharp.
In addition to aperture there is a significant influence on depth of field as the camera gets closer to the subject. At landscape distances it may be possible to render the entire scene acceptably sharp at f/8, or even f/5.6. In a landscape scene with a 24mm lens focused at 20 feet the depth of field at f/5.6 is from about 9 feet to infinity. Closing to f/8 increases the near focus point to about 7.5 feet. As we get closer to a subject such as a flower the ability of the lens to create foreground to background definition becomes more narrow. At close focusing distances even small apertures will result in limited depth of field. For example the depth of field of a 100mm lens at 50 feet at f/8 is over 25 ft, about 10 feet in front and 15 feet behind the point of focus. At 3 ft at f/8 the depth of field is 0.08 ft, just shy of one inch and about equal before and after the point of focus.
Under the Tools tab on the Cambridge in Colour website is a Depth of Field Calculator. This is something I suggest you spend some time with as you will likely find it somewhat surprising how your chosen point of focus coupled with the selected aperture results in depth of field. Be sure to click the "show advanced" option to refine the information and note the different parameters taken into consideration. Playing with the numbers is a good way to spend a few minutes when you have nothing better to do and the concepts of depth of field will become part of your visual language.
Diffraction and Image Degradation
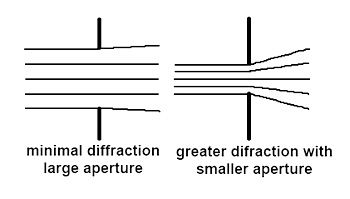
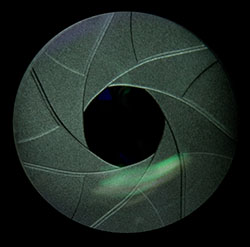
Have you wondered why your point and shoot camera won't close down beyond f/8 or even f/5.6 in many cases? First, the small sensor means that depth of field is pretty incredible even at fairly wide apertures. Second, and even more important, is that physically smaller apertures actually degrade the image quality. Light passing through smaller apertures is diffracted producing larger "Airy discs" which may overlap the grid array resulting in less sharpness. The Airy disc is named after Sir George Airy who discovered the phenomenon in which smaller apertures produce less well defined images with rings of diffused or diffracted light around them. As these overlap the capture array in a digital camera they can degrade the resulting image and limit the effective resolution.
If you came to digital photography from film you may be accustomed to using smaller apertures to gain depth of field. The increased foreground to background apparent sharpness was the result of reducing the circles of confusion created by the lens onto the film at smaller apertures. This creates the illusion of greater sharpness throughout the image. With film the random dispersion of grains in the emulsion made this a valuable technique. Digital capture is a different thing altogether. The array of sensors on the chip in your camera are not randomly dispersed like film grain was, and do not vary in size. Reductions in aperture result in smaller circles of confusion as they did in film, and depth of field increases in a similar manner.
But, there is a secondary consideration that was not a big factor in film capture. Parallel rays of light passing through the aperture start to diverge at some point creating the Airy disc, essentially a pattern of diffused rings beyond the desired circle of confusion. This is true of any optical system such as a microscope, telescope, or our cameras. When these discs overlap into an adjacent sensor in the camera the result is a degradation of the resolution. This actually happens gradually, but there are some mathematical determinations that are used to determine the point at which the image ceases to gain in sharpness, and actually begins to soften as a result of the overlap. This is called diffraction. The diffraction limit is the point at which the diffraction degrades an image to an unacceptable degree. Depending on several factors including the size of the intended output, that point can be reached at different apertures.
It is not necessary to fully understand the technicalities. In a practical sense this means that there are apertures beyond which the gain in apparent depth of field can be downgraded by the diffraction resulting in a less sharp overall image. In plain words, too small an aperture means a fuzzy photograph. Naturally, this does not occur instantly, but increases gradually as the aperture gets smaller, and the output gets large enough for us to perceive the loss of resolution.
Depth of field is something we pay attention to with the idea usually being that more is better. In the case of digital capture, sufficient is a better aim point, and not going beyond what is needed should be avoided, especially if it puts us into the realm of diffraction limitation. In most cases, for most subjects, that means an aperture wider than we might have chosen in shooting film. Depth of field should be sufficient to render the primary subject perceptively sharp. In a scenic the required depth of field would be more than with a portrait where isolating the subject with a shallower depth of field may be desired.
Optimum aperture is mathematical and takes into consideration a number of factors. The pixel density of the sensor; the pixel size is used to determine the point at which the lens will start to create an Airy disc that will degrade the image quality. Simply, the smaller the pixels the greater the opportunity for diffraction. Higher resolution cameras actually make the problem worse. There is a practical balance. Fortunately, we don't have to do the math. There are people much better at it than most of us, and we are more interested in making photographs.
To avoid too much in the way of explanation I will direct you to a wonderful web site with all the information you need to determine the best shooting practices for your camera. The Diffraction Limit Calculator on the Cambridge in Colour website allows you to enter your camera type and a selected aperture and calculate the result. If the result says "yes" you might choose a wider aperture to avoid image degradation due to diffraction. I strongly recommend clicking on the "show advanced" option in the upper right in order get more refined results.
As an example, using an APS-C camera with an aperture of f/8 will be great, at f/11 may be OK, but at f/16 you are in trouble. Intermediate apertures are not available on the calculator, but based on the Airy disc size you can pretty much determine the limit to your choices. My caveat to this is that you should run some tests of your own to determine practical limits if you are a serious photographer of landscapes. Most of my landscape photographs are shot at about f/8. The further from the camera the subject matter is, the wider the practical aperture. The proximity of the closest subject matter and the desired sharpness of near to far objects influences your choice.
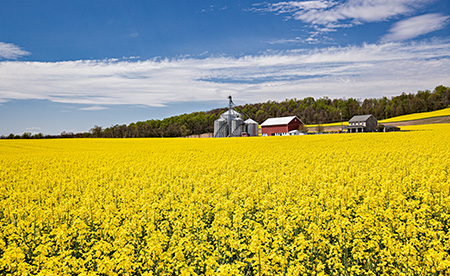
If you experiment a bit with the calculator you will also come to see that increases in depth of field closing down from f/8 to f/11, for example, are not as great as you might suspect. Choosing an appropriate point of primary focus is often a more important consideration. As much as in a portrait photograph, the point of focus for the "primary subject" in the image is most important. I have found that asking yourself a simple question leads you to the best decision - where do you want people to look in the photograph? That area should be the most sharp and secondary areas can be less than perfect. Some subject matter works best with limited depth of field as this will isolate the subject. Where a very deep depth of field is desired it may be best to shoot at the sharpest aperture of the lens and use a technique called focus stacking or otherwise blend multiple exposures to achieve the desired results. In the canola field image three exposures were made at f/8 and combined so that the entire image appears sharp foreground to background.
Gaining an appreciation for the necessary aperture for a given scene may cause you to rethink a number of things about how you approach making a photograph, including where you focus as well as your choice of aperture. While it is not practical to carry a computer with you into the field to calculate every situation, I have found that having a reference to typical situations either in your head or on a note card in your camera bag can help you get better photographs.