Output - File Formats and Printing
File Formats for Output
JPG - The jpg file as an output format allows the photographer to compress the file information in 12 optional quality settings after other processing steps have been taken in the editing software. Compressing the information, even in the highest quality setting, substantially reduces the size of the file. This makes the format popular for web and email images, but less desirable as an archiving medium as it removes image information in the process of compression. Files for output to the printer can be made into jpg files if saved at high quality as the initial step reveals little loss either on screen or on a print. Jpg files should be made in addition to full sized Tif files or native Photoshop PSD files for archiving purposes, not in place of them.
Jpg compression starts by compressing color values in the image file without compressing the image structure. Values of 10, 11, and 12 are generally indistinguishable from the original file as we are less able to distinguish minor alterations of color than detail. Even at a quality value of 8 most compressed jpg images appear unaltered. The most obvious alteration to most files is conversion to the sRGB color space if the original file is in a larger color space. Previews of the file compression can be seen using the Export | Save for Web option in Photoshop.
TIF - A preferred format for archiving and transfer of files as all of the original file information is retained. While a lossless compression option is available, it is rarely used for files to be transferred to another person as it may be less compatible with the receiver's software. Otherwise, it is the most usable file format. A tif file contains as much information as possible. Note that there can be layered tif files. For distribution to others an uncompressed flattened tif is preferable.
GIF - A file with limited (256) color used primarily for graphics, and logos. A well made jpg may actually be smaller and will be definitely better at rendering the color and continuous tones of a photograph. Gif files are less used than in the past except for some web purposes like logos.
PSD - An Adobe format, literally a PhotoShop Document, that preserves the state of the information in a file being edited, including layers and channels. This makes it possible to reopen and continue the editing process at another time. Not generally a format shared with others, but primarily a production format. Very useful for the photographer. Maximize compatibility should be set to always in file handling preferences to facilitate transfer to Lightroom. The image (right) shows a portion of a layer stack typical of a psd file.
PNG - supports transparency and 24 bit color making it more image friendly than the GIF. Logos on websites are often PNG files as the transparent backgrounds and can be placed over any color without having a field of their own around the text.
Other Formats - There are other special formats available for specific needs that are of little value to everyday photography, and you may never use more than what are mentioned above. Outside of the above formats, there are also proprietary formats that come with some imaging software provided free by some less expensive cameras. They are best avoided as they will not be usable by others, and may not even be usable by you as you move into better software. Keep it simple and stick with the formats described above.
Output resolution for monitor display
If our output is the monitor, such as an image for the web or an email, we only need to be concerned with how it will display on the monitor. On a monitor with a 100 ppi resolution a 4 x 6 inch image would only have to be 400 x 600 pixels. Compared to an original image captured by most current digital cameras this is a very small image. Now you know why your images directly from the camera look huge on your monitor (displayed at 100%, or full size). If your image pixel size is larger than your monitor resolution it will display bigger than the screen, unless you are viewing it with software that reduces the image size. An image embedded in an email will normally display at full size. Images for viewing in an email should be sized appropriately for the screen, but if your intention is another purpose, such as printing, they should be sized for the intended printing and sent as an attachment instead. They may still be viewed in the email but may be scaled down for viewing by the email program.
We can also modify the pixel resolution of our images with imaging programs to make the image size more appropriate to the intention of the image. For emails and monitor display, such as web pages, use either absolute pixel numbers or calculate the approximate size needed using any convenient number for monitor resolution (100 ppi is really easy) and you will be close enough. Precision is not necessary. Regardless of the resolution you attach to the file, the image will be rendered in relation to the monitor resolution.
Output Resolution for Printing
Printing an image on a desktop printer usually means setting the printing resolution in the printer driver rather than in the file itself, especially using LIghtroom to print. Sending a file to a kiosk for printing or providing an image for professional offset printing requires looking at the file in a different way. Now we may need to attach the output resolution numbers to the image to determine how large the image will be. The more you know about the device that will used to make the print, the better you will be able to provide an image of the appropriate size. This will mean the best quality print will be produced from your image file. The key is to think in terms of the size of the image in pixels, not in inches.
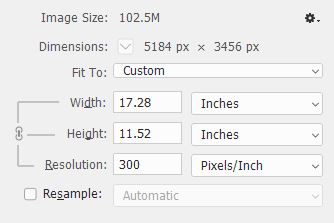
The Image Size dialog shown at the right gives us a lot of information. First, at the top we see that the image size is 102.5 megabites. The Dimensions are 5184 x 3456 pixels. Fit To says "custom" as we are not choosing a specific ratio or predetermined size which could be done using the drop down options. Note that the Width, Height, and Resolution are linked together as Resample is not checked. This means that changes to any parameter will automatically change the other two.
The Width and Height dimensions are shown in Inches and those dimensions are based on the 300 Pixels per Inch resolution. If you change the resolution number, the Width and Height numbers will change to reflect the new resolution, but the pixel dimensions at the top and the Image Size will not change provided you leave Resample unchecked. This is because you would be simply loooking at the effect of the resolution change on the output size without changing the image itself. It is sufficient in most cases to assume 300 ppi as a printing resolution and not necessary to be precise in setting the parameters. Leaving the image alone is the best option as will be explained next.
Resizing for Printing
First, let me emphasize that making larger or smaller images from your file for printing should be left to the printer. This means you should crop to the aspect ratio you need and not the specific size of the image. For example, a 4x5 aspect ratio will give you output files of 8x10 or 16x20 as they respect the 4x5 aspect ratio. Intermediate sizes will also respect the ratio, so a print specified to be 16 inches wide will print 12.8 inches tall.
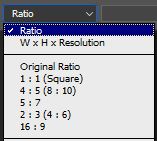
The crop tool in Photoshop offers you cropping ratios as the first choice. These represent most commonly used ratios so if you need to conform to something specific the options are already there for you. If you do not care what the aspect ratio is you can simply click the clear button to the right and the crop tool becomes a free form tool that allows you to make whatever rectangular shape you feel is appropriate to your image. This is how I crop my images as aspect ratio is of little concern to me. You can also create your own custom ratios so a group of images can be easily matched in aspect ratio.
Your inclination is to crop to a specific size and resolution, especially if you have been asked to provide an image to someone. Unfortunately, most people do not fully understand resolution. Even if you give them a file that is accurate in terms of pixel dimensions, if the specified resolution is not what they expect they will challenge you on the file. Exporting files to customers or anyone requesting an image from you may require that you crop to specific dimensions and include a resolution. The second choice down in the crop tool allows you to make those specifications if you need them. Be careful here as common terminology can be misleading. Giving someone "an 8x10 of that picture" does not literally mean 8x10 inches but is rather a means of telling you approximately what they expect in terms of size. Nobody asks for an "8 and a half by 11" when they want a copy of a text document, but you know what they mean. You are concened with the aspect ratio of the image, not the paper it is printed on.
Resizing for Web
Resizing images for specific purposes, such as inclusion in a website, is a different story. There you need to work with specific pixel dimensions, but again, the resolution is not important. While 72 ppi is assumed by most designers for the web, the only dimensions specified in the code are the width and height in pixels, never the resolution. The displayed size will be accurate in terms of pixels but will actually vary slightly based on the resolution of the monitor. Provide what is requested to avoid confusion.
If you learn to understand images in terms of the pixel dimensions you will be ahead of the game. If you need to talk in terms of inches, for example, simply multiply the inches by the desired resolution to determine the number of pixels needed. A 4x6 inch print at 300 ppi therefore requires 1200 x 1800 pixels. A 4x6 inch image on a monitor with a resolution of 100 ppi only requires a 400 x 600 pixel file. It is rather simple once you think about it a little.
Color Management / ICC Profiles
Color management is simply the control of the conversion of colors between devices. The objective, of course, is to be able to see approximately the same color regardless of the output device or media. Approximately as the device or media may have limitations on its ability to render color. Viewed on a singular device the color may or may not be either correct or as desired. By managing the color we attempt to minimize the effect of the device or media on the color.
ICC profiles are used in order to match the color values of your display with a particular device such as your camera, printer, scanner, etc. In other words, an ICC profile is a LUT (Look-Up Table) with certain properties of a color gamut where a particular color will be displayed as the exact shade of it, not just any random tone of that color. The profile essentially corrects the color based on the ability of the device. When doing color-critical work in software such as Photoshop, it’s imperative to have a calibrated display/printer as you would, naturally, want to see the same results on the print as they are on your monitor.