Photoshop - Preferences
Preferences is under the Edit menu in Photoshop and allows you to choose how the interface looks in many respects. It can also be opened with the keyboard shortcut Ctrl [Cmd] K. The options are many, but it is not essential that you change any of them unless you want to. I will suggest a few options that make life a little nicer, but you really need to make a lot of these decisions yourself. They can always be changed or restored to the original, so nothing is something you will be stuck with. Experiment if you like, but I suggest doing so a little at a time if you are not sure what the result will be. Most options can be left at the default and you may never even notice them. The "if you don't know what it means, leave it alone" approach is best.
The preferences are stored in a file called "Adobe Photoshop 2020 Prefs.psp". They are in "Users/[user name]/Library/Preferences/Adobe Photoshop [version] Settings" in the Mac OS (hidden by default) and "Users/[user name]/AppData/Roaming/Adobe/Adobe Photoshop [version]/Adobe Photoshop [version] Settings" on a PC. If you are using an earlier version there should be a folder with a similar name under the Adobe folder. There will also be a Workspaces folder and others. Adobe recommends copying this entire folder to the desktop or another safe location if you want to be able to restore your modifications in the event of a crash.
If you hold down Ctrl [Cmd] Alt [Option] Shift on launch you get a dialog asking you if you want to delete the Settings file. Removing the settings file is safe to do in the event you want to restore the original settings as Photoshop automatically creates a new file if one is missing. In the General tab there is also an option to Reset Preferences on Quit, which will also delete the existing Preferences files. Rather than only doing this once, you should occasionally revisit the dialog and be sure you are familiar with your options.
The General section can be left alone until you see something that bothers you. I turn off the beep option and the home screen. The Home Screen can be accessed at any time from the icon at the top left of the options bar, and exited with the Esc key. The primary advantage of the Home Screen is thumbnails of the most recent files accessed. You can also see linked Lightroom files, and if you use the cloud for storage you can see those files as well. I leave Export Clipboard checked as I sometimes want to copy something from Photoshop to email. If you uncheck it you will not be able to copy from Photoshop to other programs, but you will still be able to copy and paste within Photoshop.
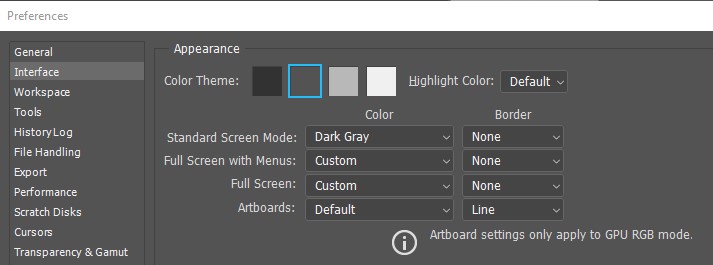
The Interface section is the first really important area to address. At the top is the Color Theme for the Standard Screen Mode. As you click on the various patches you will see the screen change to reflect that option. My preference is for the dark gray screen which is the default and I introduce other screen options on the fly in Photoshop rather than in the Preferences menu. This can be done by right clicking on the screen outside of the image in any screen view and choosing your option. This will show as custom in the menu. The Artboard is not of value to photographers. I suggest you leave the Workspace options alone.
The next important section to get your attention should be the Tools options. At the top is the option to show the Tooltips. Before long these should become bothersome and you can turn them off. Rich Tooltips are simply a bit more descriptive. Turn Gestures off. When you use shortcut keys for tools the last used tool in that group will show up. In the Toolbar you can mouse over the tool and click and hold to see a menu of available tool options. For example, the Lasso Tool includes the Polygonal and Magnetic Lassos as well. The Use Shift Key for Tool Switch option allows you to move through the various tools by holding down the Shift key which you might prefer to the expansion of the toolbar icons.
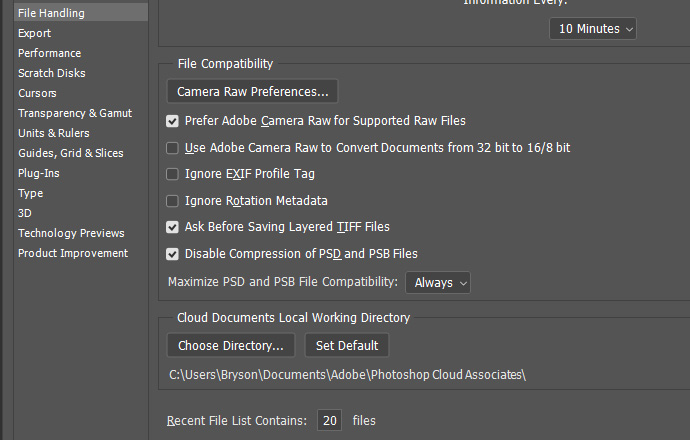
Under File Handling the single most important thing to note is to be sure that Maximize PSD and PSB File Compatibilty is set to Always. This is important to make sure that Lightroom can manage your Photoshop files. Here you can also change the number of files that will appear in the recent files list. That is what shows up when you click on File | Open Recent which makes navigating back to the last file you worked on, or any of the previous number you choose.
Export options apply to the Quick Export as Jpg parameters under the File menu Export options. While seemingly convenient there is no option for resizing the image so you will need to deal with that as a separate issue which would require reopning the document. I suggest there are other more efficient methods for creating quick jpgs for email including creating an action to control the size of the document.
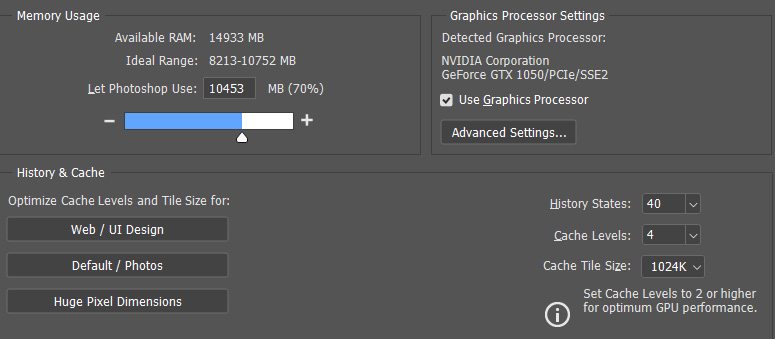
In the Performance section you can control memory usage. Photoshop is a memory hog and the more you have and can give to Photoshop the better and faster the program will respond. You will be presented with a range of ideal RAM based on what is available in your computer. The default value is 70%. If you have a lot of RAM you can use higher settings up to about 85% without creating issues with the OS or other programs. It is beneficial to have a minimum number of programs open while running Photoshop to make the most possible RAM available. More RAM is always a good thing. You can also set the number of history states you want to have available in your History panel. The current default is 50. If you click on "Default / Photos" under the Optimize Cache Levels and Tile Size you will get the appropriate cache and tile settings for most purposes.
Scratch disks are valuable in making Photoshop perform well. If you are working on a laptop Photoshop will use any empty space on your hard drive for scratch space. It is not recommended to use the C: drive on a desktop as a scratch disc if you have other options. A scratch disc should be a secondary drive on the computer, preferably one which has no other purpose. A dedicated SSD drive is a great idea, especially if you work on large files. If necessary you can also use a secondary drive that has been partitioned into multiple drive designations. The scratch disc space needs to be unfragmented free space. Under normal circumstances a scratch disc will be self managing as temporary files written to it will disappear when Photoshop is closed. The scratch drive is used primarily to keep temporary pallet conditions and the history states rather than using RAM for those purposes. However, the scratch drive can also be used to store pieces of the image you are working on, especially if RAM is not sufficient. I check the scratch drives on occasion to be sure they are empty. If Photoshop crashed for some reason a temporary file may remain on the drive. It is obviously of no value so simply deleting it will restore maximum available space.
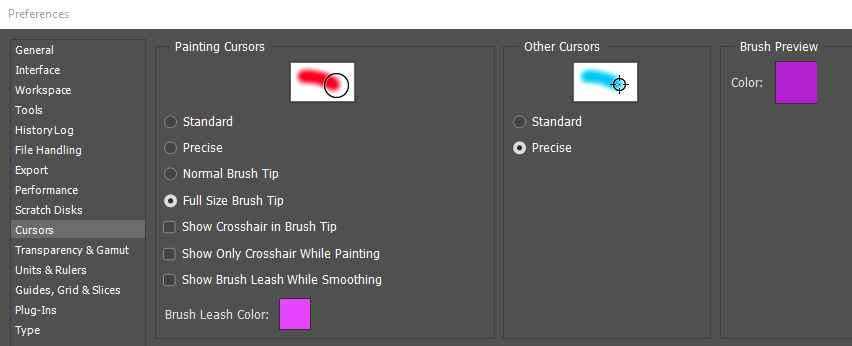
The Cursors section is valuable in seeing something other than an icon when you choose a tool such as the brush or clone stamp tool. The standard setting shows you the icon for the tool, but no indication of the size or hardness of the brush for example. Changing the option to "Full Size Brush Tip" shows you the maximum area that might be affected by the tool. The "Normal" option shows you what will be affected by anything over 50% hardness of a soft brush which could result in you getting something more than you want in an area you are painting or cloning onto. The "Precise" option eliminates the tool icon in favor of a more defined location of the center of the tool. The brush preview color is only valuable if you use the HUD keyboard option for changing the tool size or hardness which is more typically done using the right and left bracket keys for size and adding the shift key for hardness. The HUD option is to use the Ctrl[CMD] and Alt[Option] keys and the right mouse button to drag right and left for size and up and down for hardness. That can be faster for some people.
Under Transparency and Gamut you can change how transparent areas of an image appear which may appeal to you at some point as you progress but the defaults are fine to start. The Gamut Warning color can be changed here which will become useful should you decide to do your own printing. Otherwise it is of little value.
Under Units and Rulers the defaults are fine to start unless you prefer to see your rulers in inches rather than pixels as the default. This is easily changed on the fly by right clicking on the ruler. Under the New Document Presets you should check to see that the "Print Resolution" value is appropriate for your printer or intended output. Normally this is 300 ppi, but Epson print users should use 360 ppi instead or an appropriate lower value such as 270 or 180. However, since it is rare to actually create new documents and incoming document will likely have their resolution attached, this is another area which can be left alone if you are not sure what to do with it.
Guides, Grids and Slices can be modified to show up more easily in certain documents. As this is one of the Preferences that does not require a restart to take effect, changes can be made on the fly. The Grid Color is one parameter which I find myself modifying so that things like the Crop Tool overlay show up better based on the document tonalities. However, this only works with the Crop Tool in the legacy mode.
The remaining sections can be left alone unless you specifically use type and 3D assets or do graphic design.