Printing Basics
Printing Your Images
Many fine art photographers claim an image is not finished until it is printed. We didn't sit around in film days and stare at our negatives in wonder. What transpires when you interpret the image, and then print it is a wonder in itself. Don't let the fascination of electronic media keep you from enjoying the fascination of a well printed piece of your art in your hand, or hanging on your wall.
The quality and interpretation of the image is in the hands of the photographer working in Photoshop, or Lightroom. While printing your own files can be rewarding, it is another skill that requires a substantial investment in time and technical know-how that many people find a bit overwhelming. Since the file is the interpretation, the output is often a mechanical process which can be left to others. This was, of course, not true of printing from negatives unless you were satisfied with straight forward rendering of the capture, which was rarely satisfying. What used to be "custom printing" has been replaced by your processing.
Printing photos at home is a more complex endeavor than most people realize at first. You have to move into wide format professional and fine art printers to get the best of the options and produce truly fine prints that cannot be distinguished from color prints from a darkroom or commercial printer. High quality images require an understanding of file formats, color spaces, and resolution before you even think about how to run the hardware. Top quality images can be printed on top quality printers, but printing can be an exercise in frustration unless you are willing to invest in a learning curve that is arguably more complex than basic photography. It shouldn't be, but it is. Unfortunately, desktop printers that are less than professional quality printers can be very high in the cost of consumables and are not a viable alternative for high quality photographic printing. Printers also function best when used regularly, so occasionally printing introduces the possibility of clogged heads and other aggravations. Putting your time into making good image files should be your priority, and let someone else print unless you are willing to be very invested in the process.
While printing from Photoshop is possible, Lightroom affords the photographer a much greater level of control. Lightroom was designed for management and control of the printing process. Whatever you use, do not expect click and print solutions. Printing is an art in itself and requires a fair amount of understanding of color management, the software and the printer to get the best results.
I am now offering Fine Art Printing Services to photographers as well as copying services for artists. Output is with an Epson 24 inch wide format printer and a variety of paper offerings. Archival prints from this printer are estimated to provide a minimum of 100 years stability with the materials I offer.
Output Resolution for Printing
Printing an image on a desktop printer, sending it to a kiosk or service bureau for printing or providing an image for professional offset printing requires looking at files in different ways. We may need to attach output resolution numbers to the image if we are not printing ourselves. The more you know about the device that will used to make the print, the better you will be able to provide an image of the appropriate size in pixels. Offset printing houses usually request images at 300 ppi even though they do not actually print at that resolution. Since they request the files based on inches, the 300 ppi resolution simply guarantees that they will receive an image of sufficient size. In today's internet environment you may be asked to provide images at 72 ppi. If printing yourself or sending a file to a professional fine art printer you do not need to resize the image to match the desired output. The printer driver and software will resize your image for you with better results.
If you are sending an image to me for printing for example, you need only to specify the longer dimension of the print you desire. There is information on preparing images for printing on my Fine Art Printing page. Primarily, I suggest that you only crop to eliminate unwanted pixels and send me the file without resizing it. It really doesn't matter what resolution the file is in as I will modify the output resolution and set the desired size for you. Resizing your files or reinterpreting the resolution can mean lowering of quality.
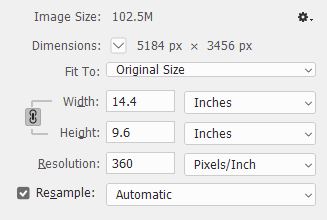
The key is to always think in terms of the size of the image in pixels. If we want to provide someone with a 300 ppi image, we need to divide the number of pixels by 300 to get the numbers of inches the file will provide, or multiply the inches by the desired resolution to determine the needed pixels. A ten inch image at 300 ppi needs to be 3000 pixels in that dimension. Epson printer resolution is 360 ppi, so a ten inch image needs 3600 pixels. The image shown in the Image Size dialog to the right has been changed to 360 ppi in order to determine its native size at that resolution. Changing the Resolution should be done with Resample unchecked to be sure that the image dimensions are not changed. What you are doing is simply seeing what the native image size will be at the resolution you set. This understandably confuses most people as your instinct is that you should provide the printer with the size image you want printed. This is not the case.
If you are printing yourself I suggest using the Lightroom Print module. In the Lightroom print module you simply choose the size you want the image to be and the resolution you want the printer to use and the software handles the rest. You leave the file alone except to crop for content. If you send images out to be printed the same applies. You may be tempted to size the file based on your desired output size, but you should only crop off unwanted pixels or crop to the aspect ratio you desire and leave the file resolution blank. This guarantees that you will not accidentally resample the resolution. The file will retain its original pixel resolution and the print supplier will handle changing the dimensions for you.
As an exercise to help put this into perspective, open an image and open the Image Size dialog in Photoshop. Note the pixel dimensions of the file. Now, with Resample unchecked change the Resolution setting to something else - anything else. Notice that the Width, Height, and Resolution numbers have a lock to their left indicated that they are locked together. This means that changing one will change the others. Changing the Resolution will change the Width and Height numbers in inches, but notice that the pixel dimensions do not change. The file is intact. The pixels are intact. Nothing has changed except how you are viewing the file relative to a proposed output. You can change these numbers all you like and the file will remain as is.
Resizing images
Let me emphasize (again) that resizing images is only necessary if you need to supply an output file for a specific purpose such as a web page. Making larger or smaller images from your file should normally be left to whoever is making the print. Most fine art photographers currently print using Lightroom, which has very sophisticated printing capabilities. One of its primary design intents was to be used for printing. Outside printing services may use Lightroom or RIP software to size the images, but will provide the best print if you follow the same basic concepts in cropping your images. In other words, crop, but do not resize. In the crop tool you want to clear the dimension boxes using the clear button the right of them.

You should crop to the aspect ratio you want without specifying a resolution in the crop dialog. Simply choose the Ratio option and clear the boxes. Now you can freeform crop as you wish with no restrictions. You can also choose specific ratios if needed or create your own. Now you will retain the most pixels, only removing those pixels outside of your crop. If you do not check the Delete Cropped Pixels box you can return to the image later and recrop as the original image pixels will remain.
Resizing images for specific purposes, such as inclusion in a website, is a similar but slightly different story. There you need to work with pixel dimensions, but again, the resolution is not important. While 72 ppi is assumed by most designers for the web, the only dimensions specified in the code are the width and height in pixels. A web designer may be looking for a 72 ppi image resolution even if the pixel dimensions are accurate. Not everybody gets it. It is typical for entry specifications for online competitions to ask for 72 ppi when simply specifying a maximum pixel dimension would be sufficient. A 1200 pixel wide image is the same size at 72 ppi as it is at 300 ppi when displayed on a monitor as there is essentially no output device to assign a resolution to.