Luminosity Masking
Simplifying the Concept
There are many terms used in processing digital images that can appear very confusing or complex. Most of them are really not that complicated. They are simply words used to describe an operation or series of operations applied to an image in the process of modifying its character. Luminosity Masking is simply the creation of masks to control adjustments using a selection based on various brightness (luminosity) levels in the image. There are even special programs designed to assist you in the process. However, the process itself is not that complex. Knowing how it works means you can refine the results.
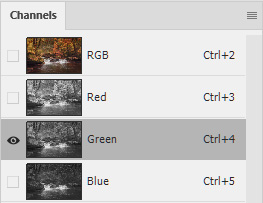
If you open the dialog for Channels in Photoshop you will see four channels (assuming RGB mode) describing the content of the image. The top channel is the RGB composite channel followed by the individual red, green, and blue channels which make up the image. Each channel contains its color along with its luminosity. This is shown as a monochromatic display of the tonal values in that channel. In Preferences you can choose to show the channels in color, but I do not find that as useful for editing as being able to view the brightness values. Your masks will be grayscale anyway. The RGB composite channel, however, is always shown in color.
It should be noted that the Image Mode of an image can be displayed in CMYK or L*a*b as well, and the channel dialog will show you the appropriate channels for those modes. That can be useful in having additional options for selections based on the luminosity of channels described differently than in RGB. For most images the RGB channels along with specific selections using Color Range are sufficient. Any of the channels created with any method can be modified with levels or curves or blended with another selection to create the necessary result.
Selections from channels
For a first example we will use a channel selection. (Ctrl) click in Windows or [Cmd] click on the Mac on the RGB composite channel to select the overall luminosity of the image. If you add an adjustment layer and Alt/Option click on the mask and you will see the mask, which looks like a black and white version of the image. It represents the luminosity of the entire image using all three channels. It may be a very nice B&W version of the image, but not always the best possible version. Use the same process on any of the other channels to see how they represent the values imposed on the image in each color. In many images the green channel is very appealing as it generally represents the most values.
Selections from Color Range
For more control over specific values, which is where Luminosity Masking is generally considered useful, we can select values using Color Range. The Color Range Dialog under Select allows us to make specific selections of luminosity or color. While Quick Mask is often useful as a Preview you may find Grayscale better as it will look like your mask.
For choosing luminosity, the Highlights, Midtones and Shadows options work best. The Highlights option will show you all of the brightest values in the image between the default 190 and 255. There is only one slider as the inclusion of 255 in the highlights is the default. But, you can choose to include or exclude values above or below 190 by moving the slider or typing in the value you desire. Similarly, the shadows range includes all values darker than 65, which you can also modify. Note the Fuzziness option. Photoshop works using math and a selection based on numbers will be quite specific, resulting in a hard mask. The purpose of the Fuzziness slider is to allow Photoshop to use additional values above and below the target numbers to soften the selection in a manner similar to feathering. It is useful to broaden your selection but realize that in most cases you may still need to use mask blurring to effectively blend in your modifications.
The Midtones option in the Color Range dialog is a real gift. With it we can make a selection of any group of brightness values we want to modify. You can use the sliders or enter two values into the Range boxes to determine the tones you wish to use in a mask. Then you choose your adjustment layer and the selection becomes your mask. Be sure to check the Fuzziness setting depending on the blending you want in the initial mask. The degree of blurring (Fuzziness) needed may be different depending on the image resolution and your intentions. Examine the image carefully as you make your adjustments to determine if the mask needs to be blurred more to avoid introducing artifacts where values change abruptly. Blurring a mask introduces the same effect as anti-aliasing, blending the tonal values so that jagged transitions are avoided.
Another important consideration in color images is the blending mode used to make your adjustment. Modifying a range of tones will affect the strongest color more than weaker values, which can cause color shifts. These can be minimal in many cases, but simply changing the blend mode of the adjustment layer to Luminosity makes sense in most cases. We are primarily interested in modifying the brightness values, after all. This is similar to what happens when we apply a vignette to images with a blue sky and the edges of the frame begin to become over saturated compared to the rest of the sky.
Manipulating Selections
Without getting into the math, there are methods Photoshop uses to manipulate selections. They are Adding, Subtracting, and Intersecting. Adding (Ctrl) Shift / [Cmd] Shift simply adds the content of a selection to another selection. The result would obviously be a larger selection. Subtracting (Ctrl) Alt / [Cmd] Option removes the content of a selection from another selection resulting in a smaller selection. Intersecting (Ctrl) Alt Shift / [Cmd] Option Shift compares two selections and retains only areas that are common to both. This is useful in refining selections prior to making channels or masks.
Automating the Process
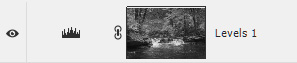
Once a selection is made it can be saved as a channel. A range of luminosity channels can be made easily and recalled as needed. The results are that the basic highlights and shadows are made into channels, and a midtone channel is created by subtracting the highlights and shadows from an overall image selection. The procedure is as follows:
- Make a selection using (Ctrl) [Cmd] click on the composite RGB channel. This makes a "highlight" mask which is actually the image as a grayscale.
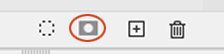
- Save the selection as a channel using the second icon from the left at the bottom of the channels pallet. You may want to name the channel something like "highlights1".
- (Ctrl) [Cmd] D to deselect
- Make a new selection as above and invert the selection before saving as a channel so the selection is now the shadows. Save and name the channel "shadows1".
- (Ctrl) [Cmd] D to deselect
- Select the entire image using (Ctrl) [Cmd] A.
- (Ctrl) Alt - [CMD] Option on the highlights1 mask to subtract the selection. This will remove the highlights from the overall image.
- (Ctrl) Alt - [CMD] Option on the shadows1 mask to subtract the selection. This will remove the shadows from the overall image.
- Save the new channel as midtones.
You now have a simple set of channels that are selections of the three primary areas of luminosity, highlights, midtones, and shadows. Important Note: in the Quick Mask mode dialog you can choose to show the default masked areas or the selected areas. Some photographers prefer the selected area option, which will cause a saved alpha channel to appear inverted. This does not affect a layer mask made from the selection. It only affects saved channels. Simply invert the selections if necessary to get the correct results, remembering that the white or lighter areas of the mask are where the adjustments will be applied.
Refining the selections even further
To refine the channels into more targeted areas of luminosity you use the intersection method on the channels as follows:
- (Ctrl) [Cmd] click on the highlights1 channel to make it active.
- (Ctrl) Alt Shift - [CMD] Option Shift on the highlights1 channel to intersect with itself. This will refine the highlights. Rename to highlights2.
- (Ctrl) [Cmd] D to deselect.
- (Ctrl) [Cmd] click on the shadows1 channel to make it active.
- (Ctrl) Alt Shift - [CMD] Option Shift on the shadows1 channel to intersect with itself, refining the shadows. Rename to shadows2.
- (Ctrl) [Cmd] D to deselect.
- (Ctrl) [Cmd] A to select the entire image.
- (Ctrl) Alt - [CMD] Option on the highlights2 channel to subtract it from the midtones selection.
- (Ctrl) Alt - [CMD] Option on the shadows2 channel to subtract it from the midtones selection.
- Save the new selection as a channel names Midtones2.
You should now have six luminosity channels with various degrees of brightness values you can use for refining your image. I suggest making this process into an action so you can apply it easily to images. You can repeat the process again to further refine the channels if you find it necessary. While additional highlight and shadow channels refine the selections in useful ways, I haven't found refining midtone channels as useful. You can also simply modify the masks using Levels or Curves which is interactive. Blurring a mask by several pixels and then modifying the result with Levels can allow you to move mask edges and/or sharpen them on the fly which is a very handy way to refine the selected areas.